How to make a guitar amp pinboard using recycled items & junk.
A Noticeboard for Emily’s room.
As you will all know by now, I love organising. In fact, if organising were an Olympic sport, I’d like to think I had a good chance of making Team GB! My family will tell you my organising doesn’t stop at putting things in labelled plastic boxes and lever arch files, or at making lists for anything and everything…It extends to organising people too…Ahem, *sheepish face*.
Despite adding a couple of finishing touches to Emily’s ‘Ikea Hack’ bedroom makeover (here) over the last few months, such as a DIY Desk and some Cube Shelves, there was still something missing…A noticeboard.
I couldn’t wait to start browsing through lots of lovely noticeboard ideas for Emily so I could bring some order to her paper-strewn desk.
- Emily’s Ikea Hack Bed
- Cube Shelves from B & Q
- DIY Desk on Ikea Krille legs
Noticeboard inspiration on Pinterest.
Since starting blogging, I’ve had to acquaint myself with Pinterest. It took me a while to realise Pinterest isn’t ‘social media’ like Twitter or Facebook. Instead, it’s a beautifully visual search engine. A search engine that enables me to store all of my favourite discoveries and answers to my questions into pretty, virtual folders. Now I’m a complete Pinterest convert and I’ve started to use it instead of Google.
I started my search for Pegboards and Pinboards in Pinterest and found some wonderful ideas:
After discovering dozens of wonderful DIY noticeboards on Pinterest, I decided I’d have a go at making one too. I wanted something colourful, funky and original and that’s when I came up with the idea of a guitar amplifier pinboard, having been inspired by the Orange guitar Amp coaster we bought my husband for his birthday.
To give myself even more of a challenge, I decided to make the pinboard ‘on a budget’, using things I had around the house and things I could source for next to nothing.
I had a good think about how I could use everyday items to create a guitar amp pinboard, wandering the aisles of B & Q and Morrisons for ages until I found just what I needed!
How to make a guitar amplifier pinboard.
Materials you will need:
- 10-12mm Plywood. Plywood can be quite expensive but I spotted an off-cut off 12mm plywood near the cutting machine at my local B & Q and they let me have it for £1! Result! (My offcut was 60cm H x 43 cm W. I had it cut in-store to 45cm H x 43 cm W).
- 2 x Addis sink savers. I got mine for £1 each from Morrisons but they should stock them in other large supermarkets and stores like The Range.
- Corkboard. I bought a cheap corkboard from The Range for £3.50, but if you have an old corkboard at home, cork placemats or floor tiles you could use them.
- 3 x Tippex bottle tops or similar tops for the Amp knobs. I spotted some cheap correction fluid bottles in Poundland. Again, you may have suitable bottle tops/caps around the house.
- 6 x 6mm wooden dowels.
- 4 x metal washers. (I think mine are 6mm). I found some in our garage.
- 50cm length of plastic cable/skipping rope/washing line. I found an old grey plastic skipping rope which would make a perfect ‘Amp cable’.
- Paint (silver, black, orange). I had some black and silver acrylic paint in the kid’s craft cupboard. I bought a tester pot of Valspar Celosia Orange Pantone emulsion paint from B & Q.
- Multipurpose filler (to fill the washers so they are easy to glue to the plywood).
- Thin hardboard or thick cardboard to make a badge.
Tools
Glue, scissors, ruler, Stanley knife, drill with 6mm drill bit, hacksaw or jigsaw for rounding off corners of plywood (optional), sandpaper to smooth rough edges of plywood, double-sided foam adhesive tape.
Step-by-step instructions.
1. Prepare the plywood. Although not essential, I liked the idea of curved corners for my pinboard. I placed a £2 coin at each corner in turn and drew around them to form a curve. Richard cut the corners using his Dremel multi-tool but you could use a hacksaw or a jigsaw too.
2. Prime the plywood. Make sure the plywood is free from dirt and dust. Paint it with wood primer/undercoat according to manufacturer instructions.
3. Paint the plywood. I had black and silver in my craft cupboard, but no suitable orange paint. I picked up a relatively large Valspar Pantone tester pot in a fabulous shade of orange (Celosia orange). Paint the plywood with three coats of orange paint.
4. Make a surround for the control panel of the amplifier. Using one of the Addis sink savers, remove the mesh from the inside using a Stanley knife to leave the outer frame. Use a Stanley knife to remove the ridges from the underside of the mesh. Cut a section out of each side and then tape it together underneath to make a rectangle 36cm W x 12.5 cm H. Glue this to the plywood approximately 3.5cm in from each edge.

Glue the grey Addis frame that will form the control panel for the knobs and switches to the plywood.
5. Paint the inside of the control panel black.
6. Add the pinboard (speaker) I bought a cheap pinboard, but you could also use cork placemats or floor tiles or something similar. Unlike the other Addis sink saver, don’t remove the ridges from the underside as they will help keep the cork in place once it has been cut to the correct size. My corkboard had a cardboard backing so I placed it cork side down on a table and placed the sink saver on top. Work out where the ridges are and using a pencil mark out the size of cork that would fit within the ridges.

Place the Addis sink saver on top of the corkboard slightly over the edges and draw around it so the cork will sit within the ridges.

Corkboard placed face down with cardboard side face up with rectangle marked in pencil ready for cutting.

The corkboard is now cut and ready to be fitted cork side down, inside the grooves of the Addis sink saver.

The corkboard (corkside down against the mesh of the sink saver) fits within the ridges around the edge of the sink saver.
7. Glue the corkboard and mesh to the plywood. Glue the corkboard to the plywood. Place a heavy book on top of it while the glue dries. Carefully add glue to the narrow strip of plastic on the inside edge on the underside of the sink saver (inside the ridges). Fix it to the corkboard.
8. Make a badge for the amplifier. Make a rectangular badge approximately 9cm by 5cm in size. I had some thin hardboard but you can use thick cardboard. Using a suitable font in Microsoft Word, print your child’s name on paper and cut it to the correct size. Glue the nameplate to the hardboard. Cut some double-sided adhesive foam to size and place it in the centre of the speaker mesh. Fix the name badge to it.

Stick double sided foam tape in the middle of the speaker part of the amp as shown, ready to stick the name badge to it.
9. Measure and drill the holes for the knobs, switches and amplifier ‘cable’. Mark the positions for the 6 knobs and switches with a pencil. They should be equidistant. Mine were started 4cm from the inside edge of the control panel and were each 5cm apart. Mark the position of the hole for the amplifier cable, 2cm in from inside the top right-hand corner.

Drill 6 holes at the points you have marked them. Drill another hole inside the top right of the grey frame. This will be for the amp cable.
10. Add the knobs, switches and amplifier cable. Hammer the 6 dowels into the 6mm holes. Fill 3 correction fluid caps (the brushes are easy to remove) with enough glue so that they will fix into position once they are placed over the first 3 dowels. Paint the knobs and the 3 exposed dowels silver. The metal washers need to be filled with filler so that they can be easily glued in place around the dowel switches and around the hole for the amplifier cable.

Hammer dowels into the 6 holes. Fill the correction fluid caps with enough glue for them to adhere to the dowel. Place the washers around the exposed dowels and also the hole which the amp cable will be fed through.
11. Add the plastic rope/cable that will be the amplifier cable. I cut an old grey plastic skipping rope to about 50cm in length and threaded it through the hole I’d made in the plywood. You could use any old suitable cable or washing line rope. Tape the end of the rope in place at the back using gaffer tape.
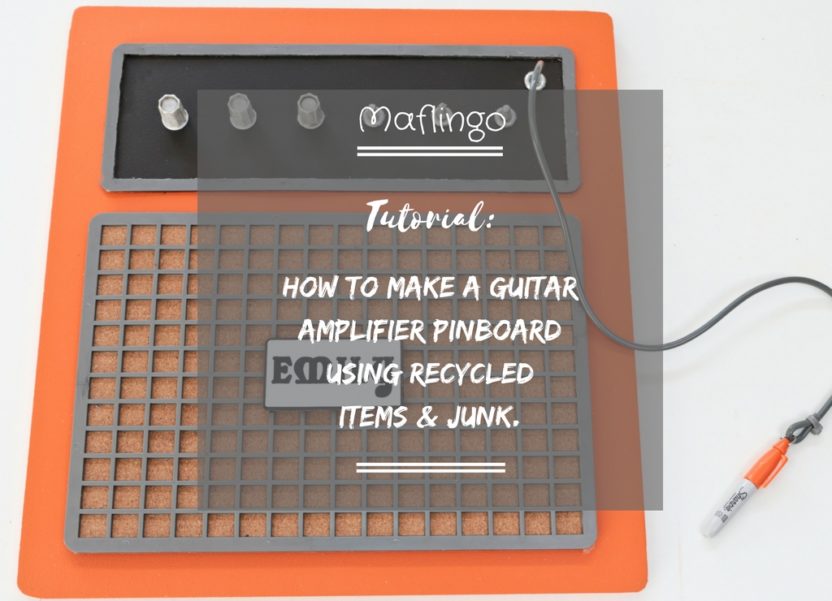
Guitar Amplifier Pinboard.
The DIY guitar amplifier pinboard is complete and I’m really pleased with how it turned out. I made it as a surprise for Emily while she was away on holiday at a summer camp. She loves it.
As well as being a pinboard, you can also hang things from the knobs and switches. I plan to slot some mini bulldog clips over the switches so I can clip some paper to them to make a notepad. I attached a Sharpie pen to the end of the cable, so Emily can use it to write on the notebook.
Over to you.
Although there are a lot of steps to this project, it’s fairly easy to make if you have the right equipment and can get the folks at B & Q to cut your plywood for you.
What do you think? Have I inspired you to have a go? Do you have some funky pinboard ideas of your own?
Don’t forget to check out my Pinterest Board for lots of other great pegboard and pinboard ideas.
Pin for later:
*****


32 Comments
Leave your reply.