
How to make an awesome DIY Star Wars Rey costume on a budget.
As I explained in an earlier post (HERE), Emily went to her first convention and dressed as Rey from Star Wars: The Force Awakens. In the next two posts, I’ll show you how to make a DIY Star Wars Rey costume & staff in my simple step-by-step tutorials and vlogs.
How to make a DIY Star Wars Rey costume.
In this first instalment, I show you how to make a DIY Star Wars Rey costume, with detailed instructions on recreating her clothing and her unique hairstyle.
In part 2, I’ll explain how to make a DIY Star Wars Rey Staff from little more than plumbing supplies, cardboard and other odds and ends.
I’ve designed these step-by-step DIY tutorials to be simple and easy to follow. Plus, this popular cosplay costume is cheap to make, too, using inexpensive materials and things you may already have at home.

Rey in her dust sheet and Primark Uggs. (Puggs)
DIY Star Wars Rey Costume on a budget: Your shopping list.
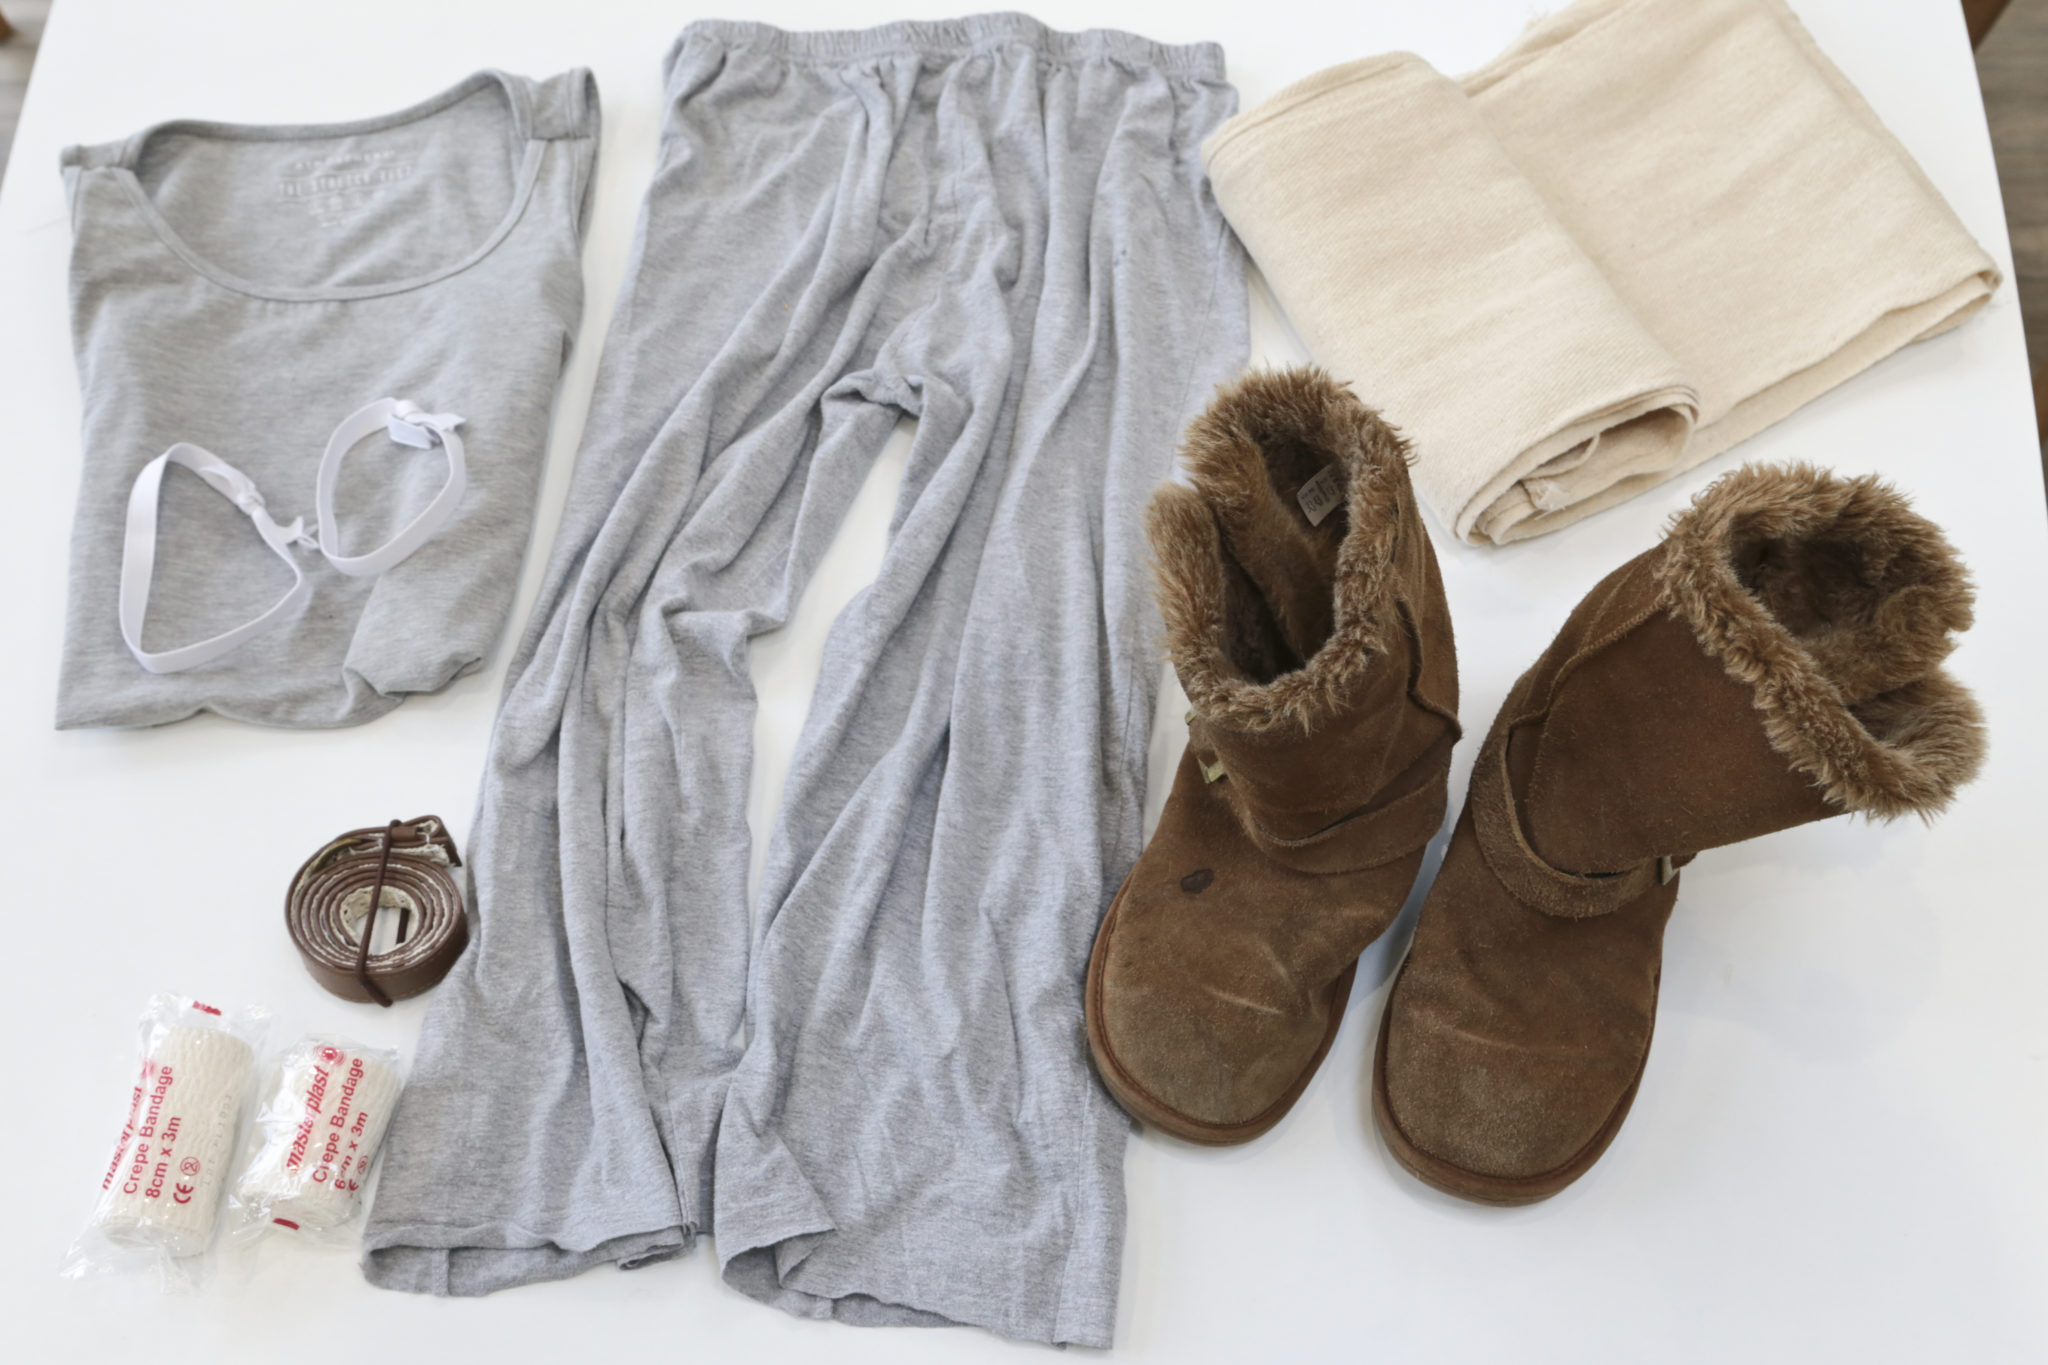
- Primark vest top (grey). We used a ladies size 6 and modified the straps for 9-year old Emily.
- Pair of old pyjama bottoms (grey). We had an old pair of pyjamas we could use. If you don’t have something at home, I’m sure you’ll find something similar in Primark, charity shops or some of the larger supermarkets.
- Pair of cheap Ugg-style boots. Emily used her Debenham’s Uggs (we call them her ‘Duggs’)…She’s gone up in the world as she used to have a pair of Primark Uggs (‘Puggs’). See, we are a thrifty family!
- A couple of rolls of crepe bandages. I bought a triple pack from Poundland containing 4cm, 6cm and 8cm crepe bandages.
- At least 60cm of elastic (we used 1cm wide elastic) – this was used to help gather the bottom of the pyjama legs.
- A brown leather (or leather style) belt. We used an old, thin, brown one. It had some lace on one side of it, but she wore it inside out and it did the job.
- A cotton twill dust sheet. We got a ‘No Nonsense’ Cotton Twill dust sheet (6′ x 3′) from Screwfix for the bargain price of £3.19! (Click here).
.

Crepe Bandages, Elastic bands and a brown leather style belt for Rey Star Wars costume
Step-by-step tutorial: DIY Star Wars Rey costume.

1. Lay out the 3ft by 6 ft cotton twill dust sheet on a flat surface or the floor. Measure at 12 inch (1ft) and 24 inch (2ft) along each of the shorter sides of the sheet with a pencil or dressmaker’s chalk from one side to the other to make 3 sections of equal width.
2. Cut along the lines you have marked so that you have three 6ft pieces long of cotton twill that are all 12 inch (1ft) wide.
3. Hem down each of the sides to prevent fraying (For the hem I turned over the edge by about 0.5cm and pressed it with an iron and then turned it over again by 1cm and pressed it before machine stitching.)
4. Stitch the three 12 inch wide panels of cotton twill together along the shortest edges to create one 18ft long piece of fabric.

The cotton twill dust sheet was divided into three equal width panels of 1 ft by 6 foot and stitched together in a long piece
5. Shorten the 18ft length of the panel of cotton twill, as necessary, depending on the child’s height. Emily is 1.4m tall, so I cut 4ft off the length of the finished panel, to create a 14ft length of fabric.
6. Shorten the shoulder straps on the grey vest and shorten the length of the pyjama bottoms, if necessary. For example, I needed to shorten the shoulder straps to fit Emily’s frame. (I didn’t hem the pyjama bottoms after shortening them as the edges would be hidden once the legs have been rolled up using the elastic to hold them in place).
7. After putting on the pyjama bottoms, cut the elastic into two 30cm lengths and loosely tie the elastic over the top of the pyjamas at the bottom of the calves. Roll the pyjamas legs up a few times (so the elastic holds them in place) until they are gathered just below the knee.
8. Wrap crepe bandages around your child’s arms from just below the armpit to the mid forearm before securing in place.
9. Slip on some ‘Uggs’ or other similar style of footwear (We used Debenhams ‘Uggs’, ‘Duggs’)
10. Wrap the swathes of fabric as shown in the Rey photograph. I’ve added a video to show you how.
11. Secure the cotton twill robe in place with the belt.
12. Create a Rey hairstyle (see video).
The final reveal: Emily as Rey from Star Wars, The Force Awakens.

Emily in her Rey costume. I will show you how I made the staff she has strapped to her back in Part 2 of the series.
DIY Star Wars Rey costume tutorial.
Rey’s hairstyle tutorial.
Over to you.
So there you go! An easy, thrifty DIY Star Wars Rey Costume. What are your fancy dress triumphs and disasters? Have you taken your children to a convention? What did you think? As always, I love to hear from you.
In Part 2 : DIY Star Wars Rey Staff tutorial.
Don’t forget to check out Part 2 of my costume-making tutorial where I show you how to make a DIY Star Wars Rey staff on a budget using plumbing supplies, cardboard, a telephone cable and spray paint! CLICK HERE.
Pin for later:
*****


17 Comments
Leave your reply.